Tuesday, November 30, 2021

Reconstruction of the Brocaded Tablet Woven Band B20 from Birka Grave 735

The following post is a copy of my documentation for my Trimaris Kingdom A&S Masterwork project from 2016, also presented at Gulf Wars XXVI.


Glossary

  1. Brocading: Technique in which a second supplementary weft is passed across the warp and brought up through the warp threads such as to be visible in the front of the band to add pattern.
  2. Brocade Weft: The secondary weft used during brocading.
  3. Shed: An opening formed in the warp between upper and lower threads on a tablet.
  4. Selvedge: The portion of a fabric which is at the edges. Since this is the location where the weft is turned in its pass back and forth during the weaving process, these edges are clean with no unraveling possible.
  5. Structural Weft: The main weft passed back and forth along the warp of the band, which provides the band with structure and locks the weaving in place.
  6. Tablet Turn: The basic motion of turning a tablet along its central axis to create the warp twining, illustrated below:

  7. Tie-Down: In brocade, these are the background threads which are used to tie down the brocade weft in place and avoid any bucking and lifting which would get caught on objects and damage the band. In addition, they help create the pattern.

  8. Twill: A textile weave where warp threads pass over and under weft threads in specific count in such a way that diagonal lines are formed.
  9. Twine: The twist of threads with each other in either a Z or S direction.
  10. Warp: The lengthwise threads in a weave structure.

Monday, February 22, 2021

I have not posted in more than 4 years, wow. I completely forgot how to log in to this site then suddenly I did?  Life has changed but I still do art, I am not so focused on weaving as I was in the past, I have expanded a bit. I will post on some of that work later. In the meantime, to all of the zero people reading this, hello!

Friday, June 24, 2016

Work in Progress - Birka brocaded band B20

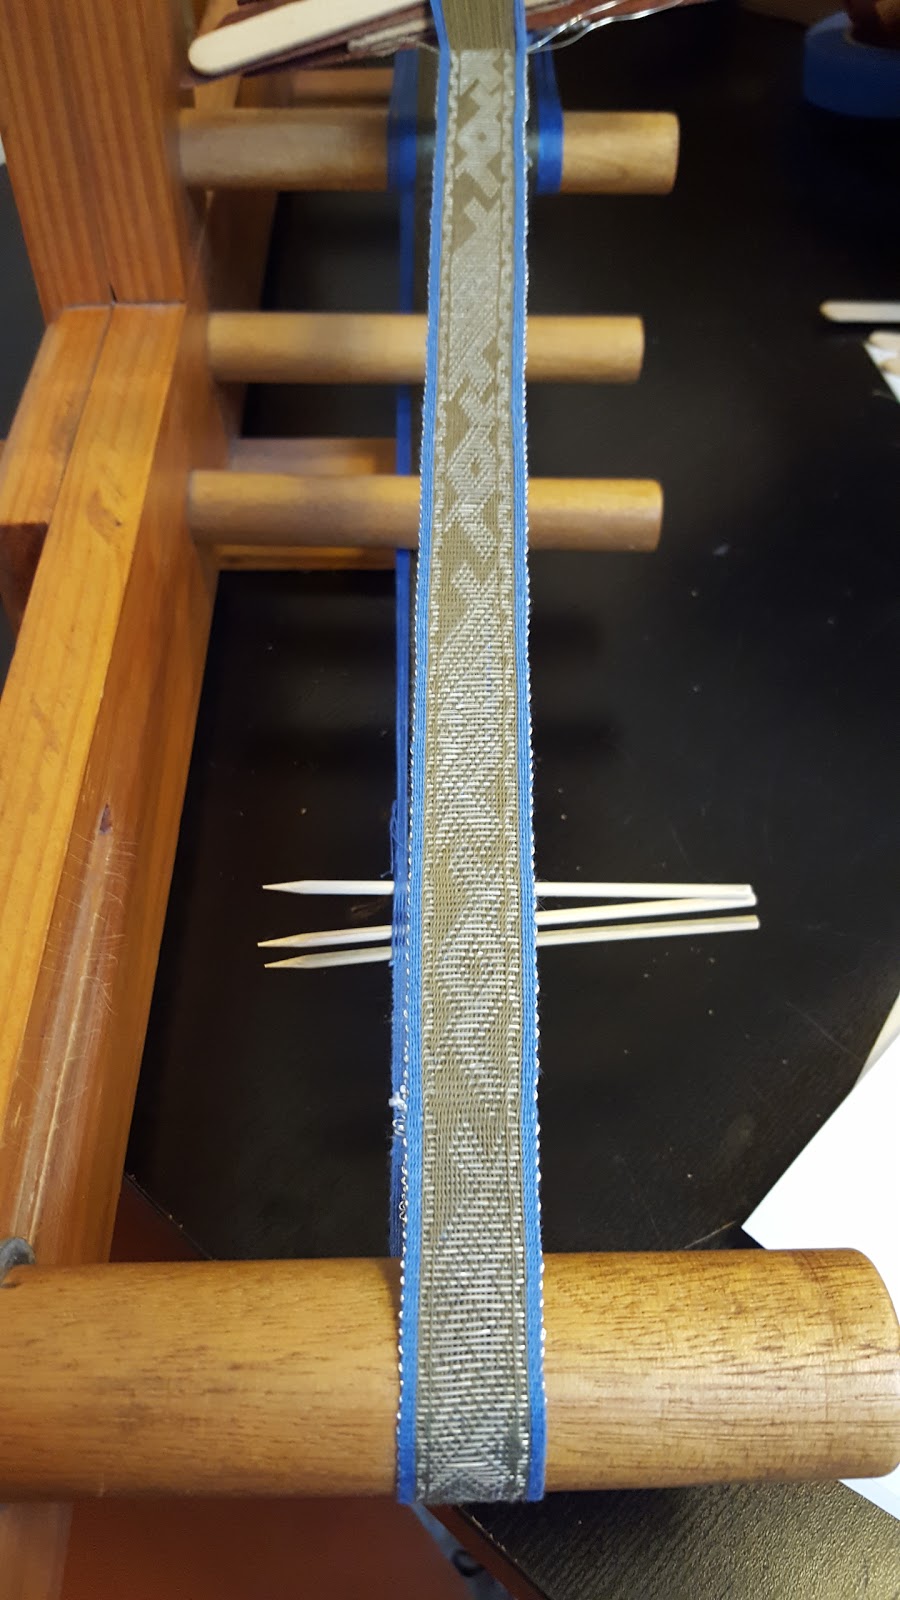
Since we're int he middle of a move to a new home, I will not have the time or energy to finish my latest project for a while, so in the meantime I am posting some work in progress images. This is band B20 from Birka. Materials used are 60/2 silk, 60/2 linen, and 30 gauge drawn .999 silver wire.

I presented this as a work in progress at Ex Opus, Trimaris' Southern Regional A&S competition event. I won overall highest score and Populace Acclaim. Seeing as the quality of work on display at our humble little Art Sci event was of incredibly high caliber, it was an honor to have my work so highly received.

Now on to the pictures!


Here is the band still on the loom. I have about 45cm already woven, and the finished piece should be ~1.5m long.


Here is the band in better light.  The blue border is linen, which does not exist on the remaining fragments of the band, but there is ample evidence that there was such a border on the piece which has long since deteriorated away.


And some closeups of the pattern. Here you can see that two silver wires are used for the brocade.


The beginning 1cm is plain weave, followed by 2cm of brocade in silk, as described by Agnes Geijer in Birka III.


Monday, May 2, 2016

Reproduction of the Animal Motif Tablet Woven Band from Evebø


For this year's Arts and Sciences Faire in the Kingdom of Trimaris, I chose to make a reproduction of the famous Evebø band. This was by far the most difficult and most fun weaving project I've worked on thus far.  There was a huge amount fo research, reading, and translation involved and I am very pleased with the results. This was the first time I enteres an A/S competition at the Kingdom level (second time overall), so I was not expecting to do as well as I did. This was meant to be entered as an Artificer level, but doe to some clerical snafus which went unnoticed due to fatigue, it was entered at the Masterwork level. I was very surprised to have scored very well, earning the Laurel's Acclaim, and this project was selected as one of the Gulf Wars entries for our Kingdom. Unfortunately, I was not able to attend Gulf Wars XXV, but some members of the Kingdom were gracious enough to take the entry on my behalf.

Below follows an excerpt of my report. The full thing is very long, but if you would like to see a full copy, please contact me directly and I would be more than happy to share.

Friday, February 26, 2016

2-Hole Pebble Weave: Reproduction of the Tablet Woven Band “Object I/7” from the Ladoga Burial Mound


The following was my entry into the Regional Art Sci Competition in the Barony of Wyvernwoode, for which I was awarded the title of Baronial Champion. I am making my documentation available here so that it is available to any who wishes to weave this band. Most of this information is freely available on the web, and the Bibliography section has links to the source material.


1.     Summary and Inspiration


In 2010, an excavation of burial mounds in Ladoga, Russia yielded a rich variety of textiles finds believed to originate from the people inhabiting a nearby Viking settlement.  Ladoga is a small town north of St. Petersburg in Leningrad Oblast, in the area historically known as Karelia. This area is in far northern Russia in the area bordering Finland. The area was inhabited in the period from the 10th to 13th centuries by Vikings, leading up to the Novgorod Rus era of the 13th to 15th centuries.

The finds at the Ladoga burial mounds have been dated from between the 10th and 12th centuries [1]. The finds consist mainly of small fragments at various degrees of preservation, ranging from small segments of tablet woven woolen bands, to small patched of woven textile in herringbone patterns. The quality of the fibers varies with some rich silk originating in Central Asia likely belonging to a wealthy elite. While some of the fibers were not of such high quality, their co-location with expensive silks in the same burial mounds indicated they probably were owned by the same wealthy person or persons [1, 2].

In the present work, a reproduction of a particularly interesting tablet woven band from the Ladoga burial mounds is attempted. Care was taken to make use of period materials and methods where possible, although there were a few differences from the tools used in period, as will be discussed.

Since the very beginning of my SCA career 2 years ago, I have been fascinated by fiber arts and specifically band weaving.  At my first SCA event, I learned to use the inkle loom, and was immediately hooked.  Within a month I had woven my first tablet woven band, and have since endeavored to attempt new historical reconstructions in a variety of techniques.  For my first entry into an Art-Sci project, I wished to attempt a technique new to me. My choice of this band to weave for my first Art-Sci project was inspired by the beautiful reconstructed band form this burial by Silvia Aisling [4] which showed the delicacy of this woven band. Aisling postulated [4] that the method for weaving this band should differ from that suggested by the original paper by Kochkurkina and Orfinskaya describing this find [1]. My attempt at reproduction confirms this hypothesis, as will be shown presently.

Saturday, January 16, 2016

Weaving in 2015

2015 for me was both an amazing year and a terrible one. I managed to land a dream job, in which for the first time in 7 years I love my job and look forward to going there each day. On the other hand, there were some very difficult losses in our family. All in all, this meant that I have not had the time nor energy to update this blog since April on 2015. This year I promise to do better.

With all that was going on in 2015, my weaving did slow down by quite a bit, but that does not mean that I was not working on some projects. Over the next month I will be updating on those projects, and in order to give myself some accountability, I will outline in this post what is to come:


  1. Ongoing work on heraldic garters made as a gift to a friend
  2. Inkle woven pick-up trim given as a gift to a friend
  3. Many ribbons made as prizes for the Fall 2015 Shrewsbury Faire
  4. Reproduction of the Tablet Woven Band “Object I/7” from the Ladoga Burial Mound (this was made as an Artificer entry to the Barony of Wyvernwoode's Art&Sci Competition for 2015, which yours truly became the Champion of).

And that's all that I worked on since 2015. a very short list, but one that I will far exceed in 2016, now that things have calmed down. I am already doing research on a new project which must be completed by February. 

Here's hoping to a very busy 2016!

Wednesday, April 29, 2015

New Project: Finnish Iron Age Band Reconstructions - Kakuola Kekomäki 376a

Ever since getting Applesies, I have been mulling over a larger sort of tablet weaving project.  Here is this fantastic book with amazing pattern reconstructions of some historical bands. So, why not go ahead and make it a project to make a reconstruction of every historical band in Applesies, and maybe a few more Iron Age Finnish finds?

I've already made the Masku Humikkala band, but I used non-period materials (cotton and bamboo viscose). For this project, I want to make reconstructions that would not be out of place in period, which means using period materials and methods. I will be working my way through this project throughout the year, maybe spacing it out with some other projects. Each time, I will make an attempt to be more and more authentic in my materials and methods.


Friday, April 24, 2015

Another Applesies Band

This is a quick update, which is about a month overdue.

I've continued to weave bands from Applesies and Fox Noses, and this time I wanted to take a break from the complexity that was the Masku Humikkala band and chose something simple.

This pattern, called small applesies, has a simple 5-forward, 5-back turning pattern and was thus very quick to weave. Still, I think the pattern is quite striking and very beautiful.

More images after the cut.

Saturday, February 14, 2015

My Attempt at the Masku Humikkala Band

I finally finished a new band!

This band is based on the Masku Humikkala band, and the pattern came from the book Applesies and Fox Noses.  I have mentioned this book a couple of posts ago, and it is quickly becoming one of my favorite tablet weaving books. I suggest anyone looking to table weave purchase it.

This band had been on the loom since October, but I only had the time to work on it in spurts, and often at SCA events where my attention span was limited. I was finally able to finish with it at The Tourney of the Three Ships in Southkeep.

I will admit that this band gave me some trouble at the beginning due to some poor fiber choices, but once I figured out how to fix the issues and how to work around the problems the poor fiber choices caused, I was able to weave it, but unfortunately with some difficulty which I'll explain after the cut.


Wednesday, November 19, 2014

The First Law of Tablet Weaving


The band that I am currently weaving is the most complex I have tried yet. Consequently, it is taking a very long time to weave, mostly thanks to the huge amount of unweaving I've had to do to fix some mistakes. This got me thinking that it would be a good idea to make a blog post about a basic rule of tablet weaving which is invaluable in figuring out where you went wrong. This rule is so important, in fact, that I like to call it the First Law of Tablet Weaving.

The first law of tablet weaving states:
"When turning a tablet, the thread which is up and moves across the top will tell you what color you will be weaving that pick."
Think of it this way, before turning the tablet you will have two threads at the "up" position (I am defining "up" as the face of the band you are weaving). When that tablet is turned, one of these threads will move towards the "down" position, and one of the threads will move across the top of the band but still remain the the "up" position. Here is an illustration which shows what I mean:


Note that before turning the tablet, the thread labeled A is in the "up" position, after turning it has moved across the top but yet remained in the "up" position. Conversely, the thread labeled B is in the "up" position at first, but drops into the "down" position after turning the tablet.  In this example the line being woven will be red for this pick because that is the color of the thread that has moved across the top of the band.

I cannot over stress how important it is to understand this rule if you are tablet weaving.  It will not only let you know ahead of time if you are weaving correctly, but if you have made a mistake, it will be invaluable in figuring out what went wrong and how to fix it.  As in all arts and sciences, understanding the theory of what you are doing before you do it will demystify the "magic" behind the patterns you are following and you will then be able to solve your own problems. In fact, once you understand this rule, it becomes possible to make your own complex patterns.

How can understanding this rule help you figure out a mistake? Well, when unweaving, paying attention to the position of the threads in the tablets which are giving you the mistake will tell you which thread moved up when you turned it. If that thread does not match the color that you are expecting, then you can further deduce whether you perhaps turned the tablet an extra turn, or maybe missed turning it altogether. It takes some practice, but since any weaver will make plenty of mistakes, and therefore do a lot of unweaving, then you will eventually be able to quickly pick out where mistakes were made.


Sunday, October 26, 2014

Finnish Diagonals

In this post I'll be talking about a technique which is almost identical to the 3/1 twill from the last post.  It's the Finnish Diagonals technique. My guide for this band was the wonderful book Applesies and Fox Noses by Maikki Karisto and Mervi Pasanen.


Monday, October 6, 2014

A Very Long Adventure in 3/1 Twill

Wow, I have not had a real post on this blog since June, and that's a real shame. Unfortunately real life has become too hectic to be able to spend much real time with weaving.

I have actually had the same project warped on the loom for the past few months and just yesterday managed to finish it up. This was definitely the most difficult project I've worked on, but one which came with a lot of fun and a healthy dose of frustration. The project was my very first attempt at 3/1 twill.


Wednesday, August 13, 2014

Mid-August Updates

I have not posted in a while due to an extremely busy life schedule ... work, school, D&D, and SCA are taking up most of my time.

I have, however, been slowly working on my first 3/1 twill project, and will try to be done with it and have a post by the end of next week.

I will have to complete another band for a piece of garb for my partner Suzanne in time for the Trimaris coronation in a couple of weeks. I promise I'll have some more posts up within the coming month.

I have also been working over the past few days (with very little success) to recreate a pattern for the Horchdoff band No. 5, after having failed miserably at finding a pattern anywhere online. Once again, I may have bitten off a more than I can chew, but this may be a longer term project.

Wednesday, June 11, 2014

"Not so Livestock" Competition - Andean Pebble Weave

On my last post, I mentioned Sangre's very successful event, the Shrewsbury Faire.  As the name implies, the event was themed as a medieval faire in the market town of Shrewsbury in England. As any proper faire, there were plenty of competitions. We had a very yummy baking contest, a cordial tasting, and a "Not so Livestock" competition.  This last one involved people bringing in their crafts with some sort of livestock theme to be judged by the Duchess (no actual livestock need apply). I decided that I would enter this competition, and managed to land a third place ribbon (also woven by myself).

Since I've been on a pickup streak, I technique I decided to go for this time was Andean Pebble Weave.  Luckily Anne Dixon's book has a couple of very nice animal motif patterns which I was able to use.  I chose swan and rabbit patters (both medieval feast fare) with some additional patterns to separate the motifs.  I also went one step further and decided to add an interesting little border pattern on either side. All in all, this is the most complicated piece I have ever woven, so it was probably not a good idea to start 2 days before the event. Once I started weaving I realized how very time consuming this technique is.  Even the "plain" weave requires a lot of pickup. Since it was just a short demonstration pattern, though, it did not take as long as it could've.

The Andean Pebble Weave technique for inkle is not exactly the same as the authentic South American craft, which is done with a backstrap loom. Rather it is a recreation of the same motifs and styles adapted for use on an inkle loom. The basic idea is to have the loom warped such that the shed is separated into background and pattern threads. Background will always be heddled and pattern will always be unheddled. This means that by doing a plain weave, you will actually get alternating bars of pattern and background.  The pebble texture is created by pickup and is ultimately achieved by alternating two steps:
  1. Weave one pick of plain background.
  2. Weave one pick of the pattern by dropping/picking up alternating pattern threads.
Repeating this will create a "pebble" pattern, with dots of pattern staggered every other pick, and the background threads forming a sort of diamond shaped pattern around them. This produces a very striking and beautiful look.

Now onto the actual weaving. this being a very complex pattern, the total number of warp threads came out to 90. It became immediately obvious that my heddles were far too thick to accommodate that many threads on my inkle loom. This meant that I had to make new heddles. 45 of them.

The inkle loom all warped
90 warp threads means very tiny heddles

Notice the separation of pattern and background threads in the shed
Since I used an amalgamation of different pattern from the book with some personal additions, I had to draft my own pattern. As always, Excel makes this a whole lot easier than doing it by hand. The pattern turned out to be about two pages long. 

I would not exactly call weaving for this technique difficult, but it is time consuming and requires a lot of concentration to keep from making mistakes.  This is just due to the comparatively huge amount of pickup that needs to be done compared to other techniques like Baltic Style.  Here the background does not form naturally, so care needs to be given to picking up to create the background every other pick.

Half of the pattern used
The swan's head

There we a few minor mistakes in picking up that I did not notice until it was too late to unweave, but the largest issue I came upon was getting the band width to stabilize. In order to keep the pebbles in the background well separated, the band needs to be woven somewhat loosely. I began way too lose and it took about a couple inches to get down to where I wanted the width of the band to be. However, even being very careful, the width of the band very gradually decreased as the weaving progressed. Fortunately, it's not noticeable unless you fold it over itself.  Since this is just a presentation piece, I am not too worried about it.

Below under the cut are some additional images with closeups of the motifs.

Thursday, June 5, 2014

First Attempts at Baltic Style Pickup

Time for another project update. This time it will be about pick up inkle weaving.  I've been wanting to try this technique out ever since I bought the wonderful book The Weaver's Inkle Pattern Directory by Anne Dixon. This desire to work on pickup also coincided with our latest SCA event, the Shrewsbury Faire. As part of the faire, there were baking and "livestock" competitions, and I volunteered to make prize ribbons. That turned out to be a very good excuse to give pickup a try.

The first thing I did was warp up the loom for the usual 2 yard length I use, and begin with a practice pattern in order to get the technique down. It's not very difficult once you get used to it, but can be somewhat tedious. The specific technique I used was Baltic style pickup, which involves warping in the sequence B-B-P-B-B-P ... with alternate threads heddled and unheddled and with the pattern (P) threads being thicker than the background (B) threads or doubled up.

Baltic Style threading scheme for 9 pattern threads
I used #10 crochet thread for the background and #3 for the pattern. For the weft I used the same thread as the backgrond, this is a requirements for this technique, as the weft thread does show through the background.  This band has 9 pattern threads.

First few repeats I wove, slow going, but not too difficult.

A great feature of Baltic Style pickup is that the reverse side of the band will have a color-mirrored version of the pattern. This can lead to some very interesting shapes.

the reverse of the band also has a cool pattern!

Once I wove a couple of feel of that band, I used some popsicle sticks (buy them in bulk, they are super useful!) to create separations and began on the prize ribbons.  For the third place, there is already a font drafter out in Anne Dixon;s book, so it was easy enough to use that. I chose a slightly different pattern from the same book. One thing which I quickly learned is that when weaving letters, special care must be taken, otherwise the letters will come out looking spiky as in the upper band shown below. My way to fix this was to use a popsicle stick (like I said, very useful) to push the pattern threads back towards the woven band at every pick. This makes them pop out of the body of the band and makes the floats come out cleanly.

Third place prize ribbons, note the top one had some issues with the spiky T.

I next set up a short warp for the first place. This time I used a blue background and metallic gold pattern. I did not have #3 gold thread so I doubled up on it to get the correct texture.  This is something I do not recommend. By having doubled up threads rather than a single thick one, the opportunity for mistakes is greatly increased.  These ribbons use 13 pattern threads.

First place prize ribbons.

I also made some second place ribbons with red background and white patter (11 pattern threads), which I think came out by far the best of the three sets. Unfortunately I neglected to take any pictures of them and they have already made their way to the contest winners.

The font patterns for 1st and 2nd place I had to draft myself since there are no font patterns included in the book for those number of pattern threads.


Tuesday, April 29, 2014

First try at Double Faced Tablet Weaving


As I stated before, there are two main purposes to this blog. 1) to document the woven bands I make and 2) so that hopefully readers will learn from my mistakes and have their lives made a bit easier. This post will try to hit on both points and specifically will focus on the double-faced tablet weaving technique.

In my previous post, which was my first attempt at tablet weaving, a couple of very important lessons
were learned:
  1. Twist is a big issue that must be dealt with, and there are ways to cope
  2. Many mistakes will be made and learning how to unweave those mistakes is paramount
  3. The tools you use will make your life much easier
  4. DON'T get too ambitious
Of course on my second attempt at tablet weaving I made some changes to accommodate for the first three lessons, but completely ignored the fourth. This will become a running theme with this blog, I think.

My second tablet weaving project was an attempt at double faced tablet weaving. This method is able to create very complex patterns with the added perk of giving you a color-switched version of the same pattern on the obverse of the band (thus the term 'double-faced').  Being still a complete beginner, I decided to take advantage of a great youtube tutorial by Marni Niles, which you can find here and here.  Marni is nice enough to provide the climbing vine pattern she uses in these tutorials, and all I did was slightly modify it to make it easier for me to read.

Now, onto the process.


Using the Right Tools

  1. Fishing swivels make taking care of warp twist a breeze (no this isn't period appropriate, but at this point I'm not going for historicity, rather I'm trying to get the process down). The idea is that each warp thread is tied off to each end of a swivel. When the twist accumulates, it can be combed out and the swivels will turn independently on each side such that you will end up with a straight warp again. The swivels I used I purchased from Amazon.  These were super cheap and very effective. I wish they had the larger loop on both ends, but they serve their purpose well. One thing I did notice is that it's best to trim off as much of the excess warp after you tie off the swivels, otherwise, the threads tend to get caught in the swivel while it is spinning fast which can lead to it becoming jammed.  One other thing I'd change is to also use swivels on the pattern threads since this pattern is not twist neutral.
       
    Swivels are a must-use for the selvedges. Note too much excess warp which did end up making the swivels jam eventually.
     
  2. Home-made tablets (made from playing cards as can be seen in the previous blog post) will do just fine in a pinch, but they wear out very fast.  Store bought tablets are laminated and will last longer.  They will also have nicely rounded edges, clearly marked hole,s and are all the exact same size and shape.  All these features makes them a little easier to turn.  This is more of a personal choice rather than a must-have, many many people do just fine by making their own tablets.  Eventually I'd like to have wooden tablets, but that is more of a pipe-dream right now.                                                                                                                  _                     
  3. It can be difficult to keep track of where you are on the pattern, which will lead to mistakes.  I've noticed that each person has their own method for keeping track of where they are on the pattern.  One thing that worked for me was to use a metallic board (I bought one at Target meant to be a message board) and use a magnet with a straight edge to keep track of my location. Any magnet will do, mine came right of the fridge (an of course is super geeky!).


Having all of the necessary implements to make my life much easier, I embarked on the creation of this new band. All in all, the process was not as difficult as I had imagined. I was very confused at first and had to unweave a few lines, but a few careful watches of the above-mentioned tutorials was enough to clear most of my questions and make the rest of the process much easier.

Learning Though Mistakes

The real difficult part was noticing I had made a mistake and having to figure out what the mistake was. One thing which made this process easier is that this technique gives you a little hint as to what the mistake was. In my case the background threads are white and the pattern was green (with blue selvedge cards that continuously turn forwards). If I suddenly found myself with the colors inverted, that is, if I ended up with green where there should be white and white where there should be green, then that means that I either skipped a line in the pattern (a pick) or I repeated a line I already wove.  This is due to the way the cards are threaded for double-faced tablet weave. If you make either one of these mistakes, the cards will be either a quarter turn ahead or behind, and the wrong color thread will come up. This is explained by the First Law of Tablet Weaving, which I will make a separate post on later.

Now Onto the Results!

All in all, I was very pleased with this project. There are a couple of mistakes here and there, but they are minor and barely noticeable (unless you know what you are looking for). Pictures below:

Close-up of the pattern. Climbing vine.
"Obverse" side of the band, green pattern on white background.
"Reverse" side of the band, white pattern on green background.


Saturday, April 26, 2014

First try at Tablet Weaving

When we last left off, I had finally gotten the hang of the inkle loom. Not being one to make things easy for myself, and often biting off way more than I can chew, I decided that my next endeavor should be tablet weaving.

Oh boy, was I in for a wild ride. Tablet weaving, you see, is orders of magnitude more complicated than inkle weaving, and provides the potential for making many many more mistakes, which I definitely did.

All in all, after some missteps, I was actually pretty happy with the results of my first tablet weaving project.

It all started when a friend of mine let me borrow the very beginner-friendly book Card Weaving by Candace Crockett.

Looking through the books, there were many simple patterns to chose from. So of course I chose one of the more complicated ones (the rams horn pattern that is so popular). A couple of hours of warping later I realized I basically had done everything wrong and had to completely give up on that misguided attempt.

Finally realizing that I am not superhuman and actually need to take realistic steps, I chose a simpler (though still challenging) pattern, the Greek Key!

It actually took me a few hours to get this warped since I was basically going from written descriptions on a book. I had read some horrors about the build-up of twist, but being as stubborn as I am, I decided that I did not want to just switch the card turning direction, so I warped it in such a way that I thought would make combing out the twist easy.

It did not make it easy, not even a little bit. Mostly because the way I chose to warp this was stupid and honestly I could not repeat it if I tried. Anyway .... much frustration and several very scary near misses later, I had somewhat of a rhythm going.

Side view of the warped loom. If it looks a bit off, it's because I did it in a very weird way.
Close-up of the pattern.

About one foot away from completing all of the 6 feet or so this loom can handle, however, I had a major mishap which led to the thread I was using for tension snapping and sending the tablets flying in every which direction. Rather than try to clean up the tangled mess that resulted, I decided to end my adventure there and called it complete. Since this was to be a major learning experience however, I also decided to braid the warp threads as a finishing touch. How hard can it be right? Well, it took a few hours, and I realized after a fact that I tied them off in a very stupid way, but I managed to finish it and it even looked really nice!


About halfway through the tedious process of braiding the warp threads.

Finished product:

Closeup of the pattern.

Closeup of the braiding.

Beginnings - How I learned to love the inkle loom

My introduction to weaving came about 5 months ago, during our shire's demonstration at Camelot Days.  This was also our second SCA event, so we were still a bit apprehensive about the whole thing.  Not that we did not like the people or the environment, we were just still shy and unsure as to whether we would have anything useful to contribute.

It was sort of awkward arriving there and seeing most of the shire members working on something or other while we had nothing really to show.  Luckily, our shire has some very welcoming and helpful members and we found a home for the day in the tent on Lady Morgan, our local fibers expert. She asked whether I would like to give a try using this funny looking implement called an inkle loom and the rest is history.

This first piece was already warped an about 6 inches were already woven. I figured I'd give it a try, and with Lady Morgan's guidance, I managed to finish the whole belt within a couple of house. Many mistakes were made. Luckily the belt was a simple plain red number, and the inkle loom is extremely forgiving of mistakes. The edges were horrendous but that's exactly what can be expected of a beginner.

My very first attempt on the inkle loom. I look very focused, which I was!
I had not expected to enjoy myself as much as I did and I basically sat there with just a couple of quick breaks util the thing was complete. It may be ugly as sin in hindsight, but I was extremely proud of myself.

I enjoyed myself so much, in fact, that I had Lady Morgan teach me how to warp the loom and got to working on my second belt  that very day. It was supposed to have a single chain pattern in yellow on a green background, but of course I screwed up the warping so I ended up with something somewhat different. I was still very happy with it, however, and the improvement in the edges could be seen as the weaving on that one belt progressed.

Oh, but that was not the end of our adventures at Camelot Days. I completed that second belt on day 2 and immediately warped a third. I was only able to get through a foot or so of that one, but completed it at home over the next few days.

Here is a comparison of those 3 belts, progressing from top to bottom:

First belt, nightmarish edges.

Second belt, edges are wonky at first, still wonky near the end, but improved.

Third belt, edges are somewhat sloppy at first, but have basically stabilized near the end. This is the first belt I'd call usable.

As the pictures make quote clear, the improvement over those 3 belts was marked. My obsession with the craft was also quite firmly cemented by that point.

I was so hooked that I had purchased the loom I worked on by the end of that 2-day event.

Introduction

Greetings!

This humble blog is the property of one John Aguirre. Scadian, aspiring artisan, craft lover, and many other adjectives.

This blog will have two main purposes:
  1. To chronicle my journey through the fascinating art that is the crafting of woven bands
  2. To provide readers with a way to learn from my mistakes and hopefully have their lives made a bit easier if they decide to embark on the same journey.
Mostly I will be focusing on inkle and tablet weaving and the many methods and variations thereof.

This fascination of mine is due to my involvement with the Society for Creative Anachronism (SCA). I belong to the Shire of Sangre del Sol in the Kingdon of Trimaris (that's Broward County, FL for those not in the know!).

Hopefully this will be a nice way to chronicle my progress and also missteps throughout the years.